With multi-station logging, every station at your site logs to the same Field Day Commander server over your local network. Stations can log from club computers, members' own laptops, or a mix. Dupe checking, the score, and the section map cover every station's contacts. This guide covers adding stations, setting up the computers, logging, and testing before the weekend. It works the same way for Winter Field Day.
There's nothing to install on the station computers. Field Day Commander runs in the browser.
What You Need
- An Field Day Commander server on your field network that every station can reach. Set Up a LAN for Field Operations covers the network.
- A computer or tablet at each station, club-owned or an operator's own, with a current web browser.
- An event with your callsign, class, and section filled in. If you haven't made one yet, start with First Event Setup.
- Someone with the Manage Stations permission to set up shared station computers. Operators at those shared computers only need their callsign. Operators logging from a personal device need an account.
Logging opens when the event starts. Operators can set up a session up to 15 minutes early, but the server won't accept contacts until the start time.
Step 1: Set Up the Stations
Each operating position is a station in Field Day Commander: the CW position, the phone position, the VHF/UHF table, and the GOTA station. Add them under Event Management > Stations with Add Station. First Event Setup explains every field. These are the ones that matter here:
- Station Name: operators will see this at the top of the logging screen, so pick names like "HF CW 1" or "VHF/UHF". Each name has to be unique within the event.
- GOTA Station (Get On The Air): check this on the GOTA station only. GOTA contacts get their own dupe checking, and the GOTA station skips the band and mode conflict check.
- Primary Radio and antennas on the Equipment tab: with both set, the session setup dialog will show which bands the station supports and warn about a band it can't cover.
- Hostname (NetBIOS Name): only needed for a station that runs N1MM Logger+ or another external logger. See Connect External Loggers.
Step 2: Put Shared Computers in Station Mode
If a computer stays at a station and operators take turns on it, bind it to that station with station mode. Do this at each shared computer on event day:
1 Sign in with your own account and open Event Management > Stations.
2 On the card for this laptop's station, click Use This Browser for Station Mode, then OK.
3 You'll be signed out, and the computer will show the station's name and a Your callsign box. That means it worked.
Use a normal browser window, not a private one, or the binding will be lost when the window closes. Set Up Station Mode covers the details, including how to take a laptop out of station mode.
Step 3: Start a Logging Session
A session is one operator on one station, on one band and mode. Here's what each operator does at a shared station computer:
1 Type your callsign in Your callsign and click Start Logging. The first time Field Day Commander sees a callsign, it will ask for a First name and Last name. Fill them in and click Start Logging again.
2 In the Start Logging Session dialog, choose the Band and Mode (CW, Phone, or Digital). Set Power (watts) to what you're actually running, since it's saved with every contact.
3 Click Start Session. The logging screen will open with the station name, band, mode, and power across the top.
4 When your turn is over, click the red Sign Out button in the top-right corner. The callsign screen comes back up for the next operator.
To QSY, use the band and mode pickers in the session bar. You should see the new band and mode after the switch, on the same station and power. Alt+B or Alt+M focuses a picker. Choose with the arrow keys, press Enter to switch, or Esc to cancel. You can also type "40M", "40", "CW", "PH", "SSB", "DIG", or "20M PH" alone in the exchange box and press Enter. Reconnect before switching if you are offline. An unavailable station or a band and mode already used by another non-GOTA station will block the switch. GOTA stations are exempt from that conflict check.
If an operator walks away without ending their session, the idle timeout will end it for them. Set Up Station Mode explains how it works.
Logging from your own device
Members with an account can also log from their own laptop. Sign in and open Logging > Log Contact. Each station has a card with a badge: Available, Occupied, or Idle. Click Select Station on an available station to open the same Start Logging Session dialog. When you're done, click End Session on the logging screen.
A station someone is using shows In Use and can't be selected. After 30 minutes with no new contact, a station turns Idle and shows a Take Over button. Taking over ends the previous operator's session and opens the setup dialog for you. You can only have one session open at a time, so if you still have one on another station, Log Contact will take you back to it. End it before you move.
Step 4: Log Contacts
Type the whole exchange into the entry field, separated by spaces, like W1AW 3A CT, and press Enter or click Log. The exchange is checked before it's logged, so a bad section or a class from the wrong event will show an error instead of going into the log.
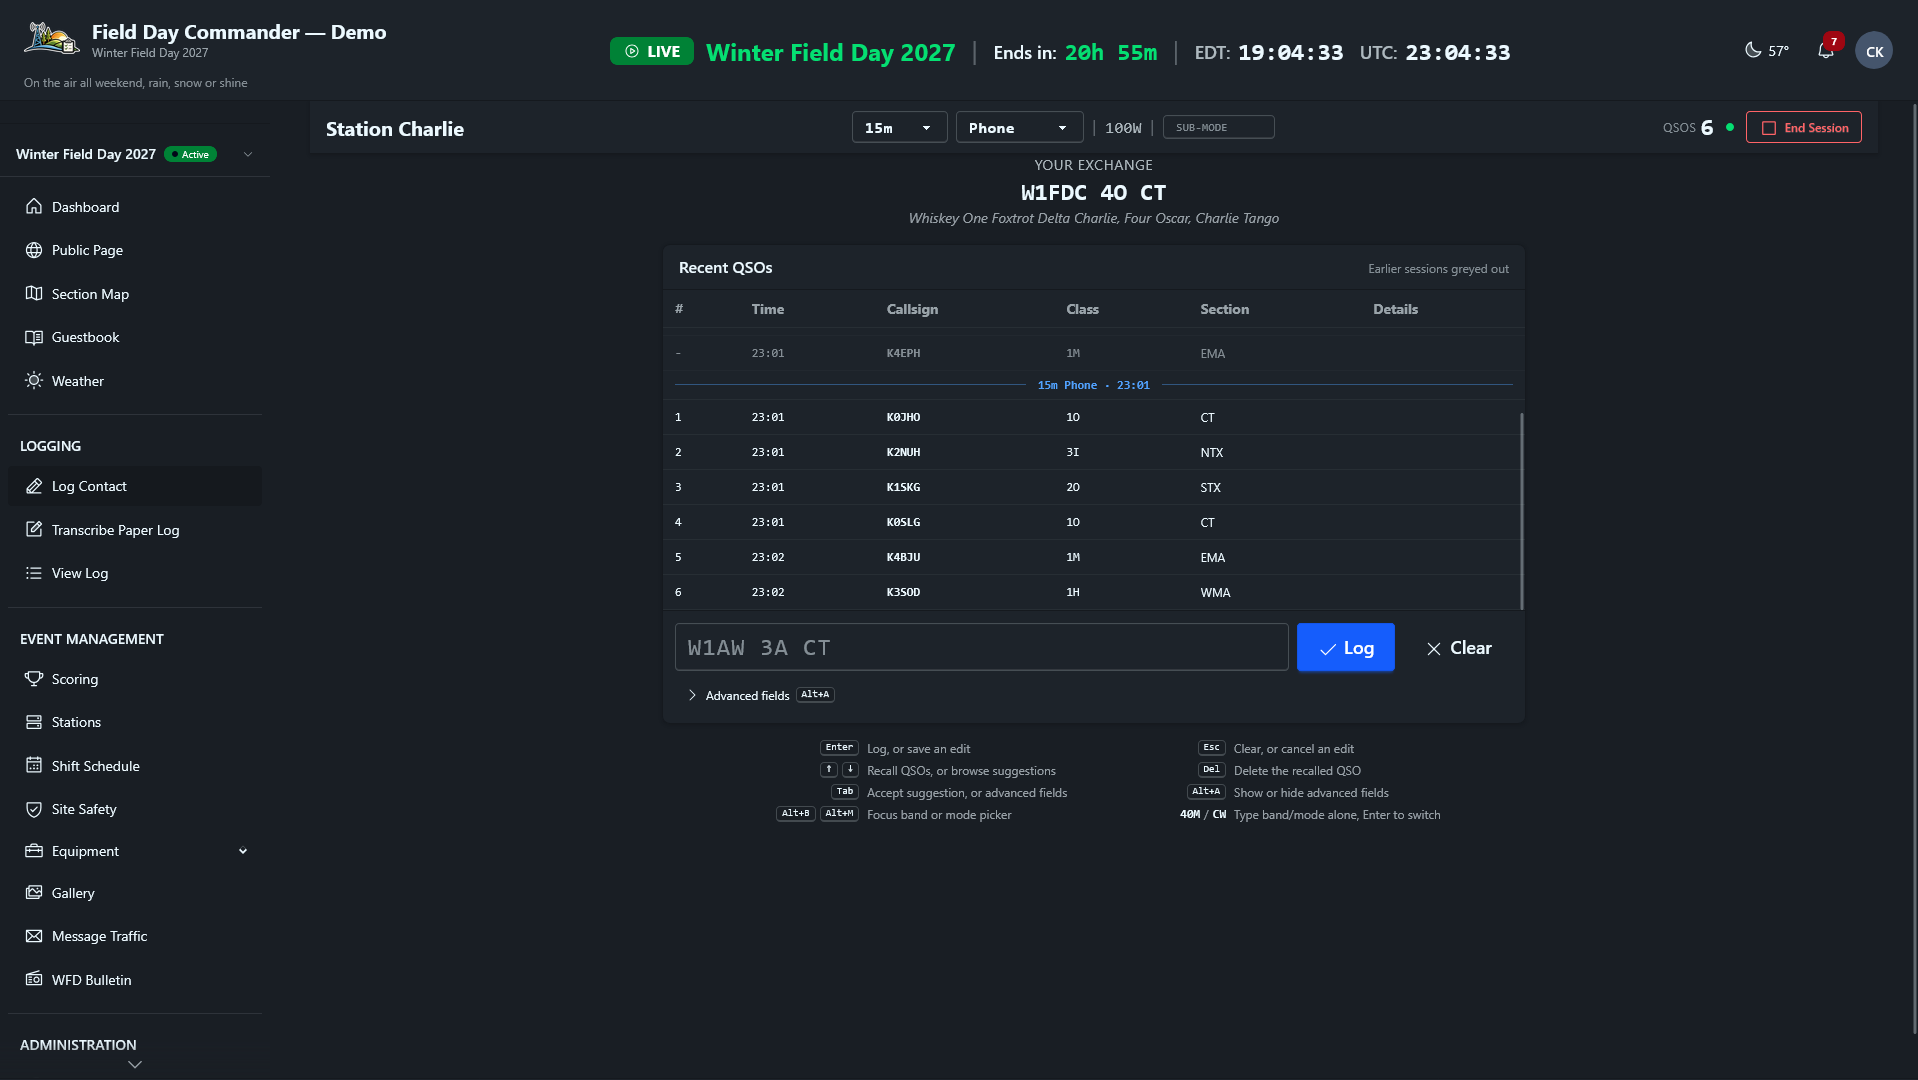
A few things on this screen make a long run easier:
- Your Exchange at the top shows what to send, spelled out phonetically for phone.
- Sub-mode, beside the band and mode pickers, is optional. Type what you're running, such as USB, FM, or FT8, and it stays set between contacts.
- Open Advanced fields below the exchange box, or press Alt+A, to enter Freq (MHz), RST sent, RST rcvd, Grid, Name, and Notes. Tab moves through the fields, Enter logs, and Esc returns to the exchange box. The panel remembers whether you left it open on this device. Frequency stays filled between contacts and through a switch if it fits the new band. The other fields clear. You should see frequency, reports, grid, and name in Details, or on the card line on a phone. If the frequency is on another band, logging stops and offers a button such as Switch to 40m. Press Enter to switch and log, or Esc to go back.
- Suggestions appear after two characters, listing callsigns your club has already worked on other bands or modes, with their exchange. Arrow down to one and press Tab to fill it in.
- Recent QSOs, on a wider screen, lists this session's contacts. After a band or mode switch, up to 20 contacts from earlier sessions in the switch chain appear greyed out under band, mode, and time dividers. Those contacts are read-only here. Open Logging > View Log to edit or delete them. To fix a contact in the current session, press the up arrow in an empty entry field (or click the row), then save, delete, or cancel. Recall loads its advanced fields too.
How Dupe Checking Works Across Stations
Dupe checking covers the whole event log, not only your station. A contact is a dupe when any station has already worked that callsign on the same band and mode. If the phone station worked K5XSR on 20m, an operator at another station who types K5XSR on 20m phone will see "Duplicate: K5XSR already worked on 20m Phone." K5XSR on 40m, or on 20m CW, is a new contact.
The warning doesn't block the contact. If you log it anyway, it's marked as a dupe and scores zero points. That costs nothing, and it's often quicker than explaining on the air.
GOTA contacts are only checked against other GOTA contacts. You'll also get a warning if the callsign belongs to one of your own participants, such as the event callsign or an operator signed up for a shift, since those contacts don't count.
Two Stations on the Same Band and Mode
Field Day and Winter Field Day both allow only one transmitter per band and mode at a time. If another station is already on the band and mode an operator picks, the setup dialog will name that station, and Start Session will refuse with "This band/mode combination is already in use at" followed by the station name. Pick a different band or mode, or sort it out with the other station.
During a session, the logging screen checks again every 30 seconds and shows a warning bar if another station turns up on your band and mode. That can happen when a station running an external logger changes bands. The bar won't stop you from logging, but somebody should move.
The GOTA station is exempt from this check. The underlying band-and-mode restriction and GOTA exception are in ARRL’s 2026 rules, sections 6.5–6.9. Check the WFDA rules for a Winter Field Day event.
A Live Score and Section Map for Everyone
Each contact shows up in every signed-in browser as soon as it's logged. The Scoring page, the Section Map, and the dashboard widgets update without a reload. A dashboard shown without signing in, like one on a TV, refreshes on a timer instead.
Networked Logging with N1MM Logger+, WSJT-X, and fldigi
Stations don't all have to log in the browser. N1MM Logger+, WSJT-X, JTDX, and fldigi can send each contact to Field Day Commander over UDP, and those contacts get the same log, dupe check, and score. Field Day Commander opens a session for that station automatically, so it shows as Occupied while contacts are coming in.
You can mix the two: the CW station on N1MM Logger+, the digital station on WSJT-X, and everyone else in the browser. Connect External Loggers walks through the setup.
The GOTA Station
On a shared GOTA station computer, the screen asks for a Control operator callsign. The control operator (usually your GOTA coach) starts the session, and each GOTA operator gets entered in the GOTA Operator section of the logging screen. Turn on Supervised Session (GOTA Coach present) when the coach is supervising. Set Up Station Mode covers the rest.
When a Station Loses Wi-Fi
Every contact is saved in the browser first, so operators can keep logging through a Wi-Fi dropout. While the laptop is offline, the dot next to the QSO count turns red and the header reads "Offline" with the number of contacts waiting. Waiting contacts show a SYNC tag in Recent QSOs. When the connection comes back, they'll be sent on their own and the dot will turn green. Each contact keeps the time it was logged.
Waiting contacts will survive a page reload or a restart. Don't clear the browser's data until they've synced, or they'll be lost.
The dupe warning can't appear while the laptop is offline, but each contact is still checked when it reaches the server.
If the server turns a contact down, it moves to a red failed list in the header. Click it to see the reason, then retry or discard each contact. Two reasons come up most:
- Session expired. Refresh the page, then retry. The contacts are still stored in the browser.
-
"This operating session has ended." The contact was logged after the session ended. This can happen when an offline laptop's station becomes Idle and someone takes it over from another device. Contacts logged before the session ended can still sync.
To recover the rejected contacts, enter them with Logging > Transcribe Paper Log. Once they are saved in the log, discard the failed copies from the browser.
Marking a Station Unavailable
When a station goes down, mark it unavailable so nobody starts a session on it. On Event Management > Stations, click Mark Unavailable on the station's card, pick a Reason, and add a Note (optional) if you like. Any session on that station ends, and its Select Station button on the Log Contact page is disabled and shows "Down" with the reason. Click Mark Ready when it's fixed.
Test Your Multi-Station Setup Before Field Day
Logging only works while an event is running, so create a short practice event that covers your test time and add two or three stations. Then, with the real laptops on the real network:
- Put each shared computer in station mode for its station in the practice event.
- Start sessions on two stations on different bands and log a contact on each. Both should show up on the Scoring page on a third device.
- Try to start a third station on a band and mode that's already in use. You should see the warning, and Start Session should refuse.
- End both sessions. On the second station, start a session on the first station's band and mode and type the callsign it logged. You should see the Duplicate warning.
- Have a few people take turns at one laptop: type a callsign, log a contact, and click Sign Out.
- Turn off Wi-Fi on one laptop, log two contacts, and turn it back on. The header should show "Offline" with two waiting, then the dot should go green.
- If a station uses N1MM Logger+, WSJT-X, JTDX, or fldigi, send a test contact from it (see Connect External Loggers).
- On Field Day, bind the shared computers again to the real event's stations. They're still bound to the practice stations.
Most mix-ups at a shared laptop come from operators who walk away without clicking Sign Out. The next person then logs under the wrong callsign. Mention it at the operator briefing.